Saturday, September 19, 2009

First Homebrew!

Well the first batch of "beer in progress" is in the fermentor.  I decided to go with a canned malt extract kit, Muntons Nut Brown Ale, for the first time as it was less work and I could ease my way into it.  It was suprisingly very simple.  The hardest part was making sure the equipment was sterilized. For that I used Glosan-NC cleaner.  I was a little worried about cooling the wort quickly enough, I sent Jinger to the store twice for ice, but with the 5 bags of ice that I went though, it cooled down in no time.    

I used the spray hose from the faucet to aerate the mixture after adding the yeast.  I know the tap water isn't sterile as some people swear by, but Corey said that this is the way he has done it and he has had success so far.  The method that Larry from Larry's Brewing Suppy told me to use called for using water straight from the tap as well, but most of the stuff I have read recommends boiling it.  Either way I had steadily bubbling in my air-lock the next morning, so somethings fermenting in there. 


I have the fermentor stored in a closet on a nice cool tile floor.  If I were yeast it seems like a nice place to work.  Hopefully they feel the same way and make us some good beer.  I also got a used Cornelius Keg from Larry's.  I scrubbed it down real good and Jinger was able to get her arm into the opening far enough to scrub the bottom. With the o-rings changed and a little elbow greese it looks like new. 

Now it is just waiting time until I am ready to keg and force carbonate.  With some advice from Corey I decided to skip the whole bottling process and go straight to keg, thanks Corey.  It cost a little bit more than I originally planned but it will save a lot of work in the long run.  If everything goes as planned Jinger and I will be sipping on our own homebrew in a couple of weeks. 

-Josh

Friday, September 18, 2009

Chest Freezer Kegerator!

I recently built a kegerator and wanted to post a little step by step to show, those of you that are interested, what I've done.

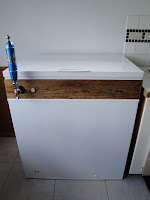
I started with a Frigidaire 7.2 cu ft. chest freezer, $200 at BestBuy. I decided not to drill through the top of the door, like some others have done, but instead build a collar for the taps to go through.


I bought a couple of nice, premium grade 2x6 at Lowe's for this. They wouldn't cut the mitered corners like I wanted so I had to do it myself. Thanks Dad for all the practice at Shaver Brothers over the years! With Jinger as my lookout I quickly "borrowed" the miter saw from the contractor who was working on the stairs down to the lake. Thank you Leon. Eight carefully measured chops later and we were well on our way.

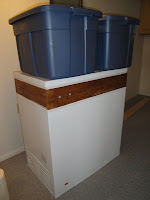
After a little screwing, drilling and staining, the collar was starting to come together. I used some metal brakets in each of the corners and some Elmer's Glue to help hold it together. I detached the hinges from the back of the freezer and once the stain dried I siliconed the collar to the upper rim. The excitement of draft beer at home got to me so I was only able to put one coat of stain on the wood. The hinges from the lid attached easily to the collar and then I secured the collar to the freezer with a few metal brackets. It all came together pretty easy.

I didn't have the strength to wait that long for the silicon to dry but I weighted the top down with a few bins full of junk for about two hours until I felt that it was ready to go.

Jinger and I drove over to Big Al Brewing to pick out the inaugural keg. After a taste test we decided on a 1/6th barrel of Irish Red... mmmmmm!

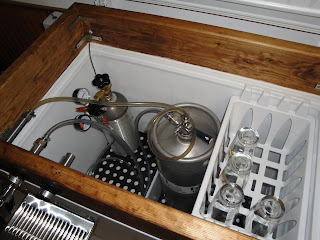
Most of the draft beer components that I got for the fridge came from Larry's Brewing Supply in Kent, WA. That included all the gas and beer lines, CO2 tank, regulator, faucet, tap and the Ranco digital temperature controller. I bought an "anti-fatigue" rubber floor mat from Lowe's that I cut up to line the inside bottom of the fridge to help avoid the inevitable dropped keg from doing to much damage.


I decided to get a stainless steel drip tray but struggled with a good way to mount it to the fridge.  I didn't want to drill holes in the front because of the risk of hitting the heat exchange coils that run through there near the surface.  I tried glueing some magnet strips that I picked up at the craft store to the tray but they were not strong enough.  I found some wicked strong Neodimium magnets online that did the trick once Krazy glued on to the tray. 


We've got room for any combination of three 5 gal. Corney Kegs or commercial 1/6th barrel kegs.  Right now it is a keg of Big Al's Abbey Wheat, we finished the Irish Red, until I keg my first batch of homebrew!


Thursday, September 17, 2009

First Blaahhgg!


We decided to start a blog to help keep in touch with family and friends throughout the world.

Even with all the fun we seem to be having, doing whatever it is we are doing,we still look forward to seeing you all again soon... hopefully not too soon!


J and J

Thursday, September 10, 2009

Visit to Mount Rainier National Park


We went down to Mount Rainier National Park the other day for a few short hikes.  It is about 50 miles Southeast of Seattle so we packed a lunch and made a day of it.  It is a really beautiful mountain.  It is amazing to be down in relatively warm weather and see the glaciers up on the mountain.  We will have to come down here again when we have more time to explore and do some camping. 

We also had to clear a fallen tree from the trail so that we could get back out (and to save a trapped baby), but we will save those heroic stories for sharing over a beer.